

How To Screen Record On iPhone While Gaming will be described in this article. Millions of people worldwide now consider the iPhone to be the ultimate gaming device thanks to the recent exponential growth in power of Apple CPUs. You are aware that in this day and age of social media and sharing, something didn’t happen if it wasn’t shared with your pals on Discord or on Twitch, right?
How To Screen Record On iPhone While Gaming In 2024
In this article, you can know about How To Screen Record On iPhone While Gaming here are the details below;
You’ll be glad to hear that recording your iPhone gaming sessions is both totally feasible and incredibly simple. Furthermore, you may record your iPhone or iPad from your Mac if you’d want even more options (such as annotating your video, adding audio, etc.)! To learn how to capture your iPhone’s screen right now, continue reading.
With a fresh set of apps, unleash your creativity.
Explore the Setapp collection of more than 230 artistic tools and apps for Mac and iOS. Try it for free!
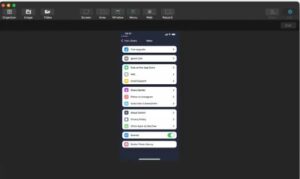
Record your iPhone or iPad’s screen by connecting the device to a Mac
Although iOS devices include built-in screen recording capabilities, these might not always be sufficient, particularly if you need to edit your films or take additional pictures. We’ll demonstrate how to use the Capto app to link your iPhone or iPad to a Mac in order to record its screen. You can use it to record the screen of your iOS smartphone while using a Mac. After filming, you can edit your video with Capto’s tools to add effects, trim, and clip it before sharing it with your audience.
To record the screen of the iPhone or the iPad using Capto, just follow these easy steps:
- Use a lightning cord to link your iOS smartphone and Mac.
- Use your Mac to open Capto.
- Click the Record button in Capto to bring up a dropdown menu.
- Your iOS device will be detected by Capto. To make it visible on the screen, click on it.
- Next, to begin recording the screen of your iOS device, click the red Record icon.
- To stop recording & the simply click same button when you’re done.
- Your recording will be automatically saved to Capto’s library. By choosing it from the collection and utilizing Capto’s editing features, you can make changes to your recording.
- Once editing is complete, you may share your recording with your audience by exporting it to a number of different formats, such as MP4, AVI, and MOV. Try the standard approach with the iPhone or iPad native tool if you don’t want to record your device from your Mac.
Try the standard approach with the iPhone or iPad native tool if you don’t want to record your device from your Mac.
How to record screen on iPhone and iPad with native Apple tools
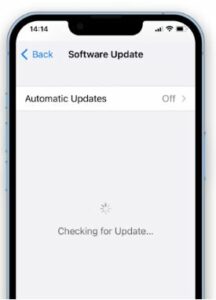
The first thing to be aware of while learning how to record your iPhone screen is that this capability is limited to iOS 14 and later versions. Install the most recent version of iOS from Settings > General > Software Update if you’re using an outdated version.
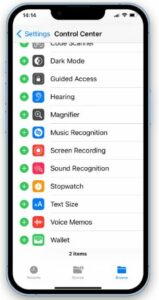
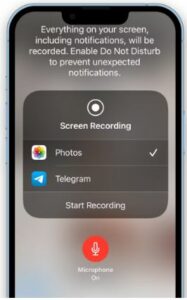
Then, since Screen Recording is an additional button that shows up in your Control Center, you’ll need to learn how to add screen recording on your iPhone. To carry out that:
- Open Control Center by going to Settings > Control Center.
- After navigating the options, choose Screen Recording.
Now that you know how to obtain screen recording on iPhone, you can always access it by swiping down from the top-right corner of the device to open the Control Center menu (swipe up on previous iPhones).
So, how can I record my iPhone’s screen? You just need to open your Control Center and select the Screen Recording button whenever you want to. Before the recording begins, there will be a three-second countdown, so you can get ready and resume your game.
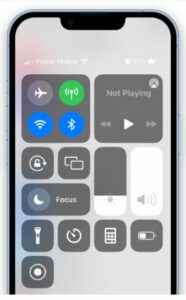
There will be a red panel at the top of your screen when screen recording is in progress. You can record for as long as you like.
It’s also rather simple to screen record on an iPhone with sound on:
- Long-press Screen Recording rather than tapping on it.
- To turn the microphone on, tap the Microphone Off button.
- Get the recording going.
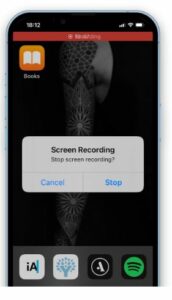
How to end screen recording on iPhone
Therefore, after learning how to enable screen recording on your iPhone, you also need to understand how to disable it.
Here, you have two choices. Either way, you can tap the red panel that is above your screen. A pop-up option will appear; select Stop. As an alternative, you can select the Screen Recording icon by returning to the Control Center.
How to edit your iPhone screen recording
You now understand how to activate & the deactivate the iPhone’s screen record feature. Your recordings are then immediately stored in the Photos app, where you can view and modify them as you see fit.
In relation to editing, it’s most likely not flawless the entire time if you record your gaming session, particularly if it’s a long one. You should, at the very least, crop the edges and save the finished product as a new video clip.
Here’s how to locate and modify an iPhone screen recording:
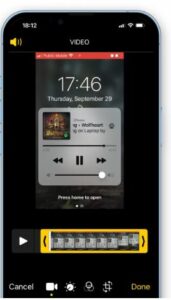
- Launch the Photos app.
- Press on the recently captured video.
- To set the beginning and ending points of your video, drag the timeline’s edges at the bottom of the screen.
- Check that the edit is satisfactory by watching the video.
- Click on Save Video as New Clip > Done.
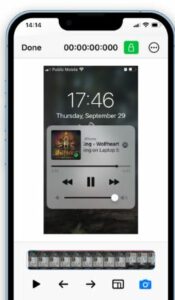
With Photos, you can also make considerably more advanced modifications to your videos. To change the saturation, contrast, brightness, and shadows, simply tap the dial button. To alter the appearance of your movie and add pre-made filters, tap the circles symbol. Lastly, if necessary, tap the last icon to trim or rotate your movie.
Once the editing is complete, you still need to upload your finished video to share it. To display your movie, the majority of sharing sites will require a cover image. Additionally, you should have a fantastic cover image to entice viewers to click & the watch your video. Though it’s not very accurate, you may try using the iPhone’s built-in feature to take a screenshot. Simply use SnapMotion in its place.
The greatest app for taking pictures of your films is called SnapMotion. With its easy-to-use editing interface, you may choose the precise moment you wish to use as your cover by measuring video speed down to the thousandth of a second. No issues if you need to post a horizontal screenshot after recording a vertical video. Simply turn the video in SnapMotion to the right. It only takes a few seconds to take as many screenshots as you’d like!
How to share your screen recording with others
You may start making a lot of game videos once you figure out how to record video on the iPhone screen. But how can you distribute them to other people?
iPhone offers some suggestions, some of which may be restricted:
- Launch the video in Photos.
- Select the “Share” icon.
- Select from Messages, Mail, AirDrop, and additional apps.
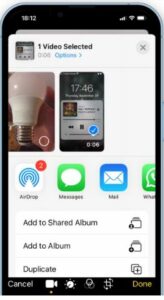
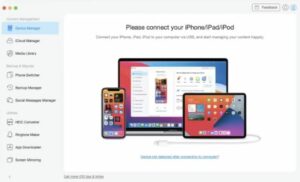
The issue is that certain of these apps limit the quantity of files or deteriorate video quality when transferring. Additionally, it’s a far nicer experience to upload your film to the internet from your Mac if that’s your plan. In that scenario, AnyTrans for iOS is the greatest transfer utility available.
An easy-to-use iPhone manager for Mac, AnyTrans for iOS allows you to manage iCloud, download and install updates, manage media, alter ringtones, and much more. AnyTrans can also be used to move any kind of material, including high-definition videos, across devices.
Do you recall how we discussed using Capto to record the screen of your iPhone or the iPad by connecting it to a Mac? Sharing even huge films from your PC is simple when you record using Capto. Capto is a great option for anyone wishing to record and share high-quality films because of its robust editing features, compression capabilities, support for several export formats, and connectivity with cloud storage.
Advice: Boost your iPhone gaming experience with Boom 3D, a professional audio improvement app made to play all of your media content on headphones or speakers with amazing 3D surround sound, equalization, and audio effects from any player, any media, or any streaming service.
Boom 3D’s multi-channel 3D surround sound was created especially for gaming, and it offers unmatched clarity to every in-game interaction. Boom 3D captures every aspect in vivid, precise detail, from the sound of a dragon roaring to your opponent’s muffled footsteps, which will help you win!
How to record my screen on iPhone: Final thoughts
As you can see, it’s not hard to set up screen recording on an iPhone, and it will enable you to participate much more in the online gaming community. To learn how to the screen record on an iPhone with sound, simply follow the instructions above. Using some of the top applications can also be beneficial. You can easily get your movie onto a Mac with AnyTrans for iOS, and SnapMotion will provide you with a fantastic cover image. Additionally, Capto is a great tool for easily recording iOS screens on a Mac. Moreover, Boom 3D is something you should definitely attempt if you want to play all of your media with amazing 3D surround sound.
Best of all, Setapp, a platform with over 240 excellent Mac and iOS programs and utilities, offers SnapMotion, AnyTrans for iOS, Capto, and Boom 3D to you for free for a whole seven days. For example, you can use CleanMyMac X to optimize your Mac completely and NotePlan to organize and manage all of your work. Get these and more Setapp apps for free, then discover what becomes your new favorite!


